The dmidecode command in Linux allows users to retrieve
sensitive hardware-related information directly from the command
line. This way, users can obtain useful information like serial
numbers and processor cache values without taking apart their CPUs.
In Linux, the dmidecode is known as the DMI table decoder, and it
simply decodes hardware information from the SMBIOS (System Management BIOS) of your
system. When used carefully, dmidecode can provide an extensive
amount of interesting information. That’s why we have curated this
guide outlining some of the most amazing things you could do with
dmidecode. Continue reading to master these commands thoroughly.
[1]
dmidecode Commands for Linux
Geeks
We can get a plethora of information related to the system,
bios, processor, memory, baseboard, and other essential hardware
components using dmidecode. Although most commands are pretty
simple and self-explanatory, new users often find them hard, mainly
due to unfamiliarity. You can check out the below commands to learn
the workings of dmidecode in more detail.
1. Print Entire DMI
Information
The simplest application of the dmidecode command provides all
the information available in your DMI (Desktop Management
Interface) table. This command simply fetches the binary encoded
data and decodes it before presenting the text values in your
Linux
terminal emulator. [2]
$ sudo dmidecode
You will require sudo privilege or may even use
your root account for testing these commands. The DMI table
contains entries for more than forty types. Each type usually
contains information related to a specific hardware component. You
will know more about them as you progress.
2. Scroll Through DMI
Contents
As you should already notice, simply running dmidecode yields a
lot of information. It often proves difficult to explore through
this vast amount of data and find the information we’re interested
in. Luckily, we can pipe this data through commands like less/more
and scroll over them with some control.
$ sudo dmidecode | less
$ sudo dmidecode | more
We found less to be more useful since we can then scroll over
the dmidecode output using PageUp and
PageDown.
3. Suppress Unreliable
Data
Since the DMI table contains many unknown/non-existing entries,
users might want to reduce these fields as much possible.
Thankfully, we can utilize the -q or
–quiet option to do exactly this. Take a look at
the next command to see how this works.
$ sudo dmidecode -q | less
$ sudo dmidecode --quiet | less
Now, dmidecode will become less verbose and omit a lot of
non-specified information. Most metadata and handle references will
disappear from its output.
4. Dump DMI Contents in
Hexadecimal
Linux dmidecode allows users to dump the contents of the DMI
without decoding them. This way, you will get hexadecimal data,
which are very useful in debugging CPU issues. Note that,
dmidecode will not output binary data in such cases, but simple
text with hexadecimal and ASCII contents. [3]
$ sudo dmidecode -u | less
$ sudo dmidecode --dump | less
So, simply adding the -u or
–-dump option to dmidecode will do this job. You
can scroll over the output to see how it looks. It should contain
both hex and string values.
5. Dump Binary
Output
You can save the contents of your DMI table in a binary format
using dmidecode. This can become helpful in a number of situations.
For one, you can relocate your DMI data among different
workstations and maybe inspect them later. Take a look at the below
illustration to understand this in more detail.
$ sudo dmidecode --dump-bin TEST
Now the DMI values will be stored in the file called
TEST in a binary format. You can use standard
Linux tools[4] like cat and file to
verify this data.
6. Read Stored Data
Linux and BSD users may also retrieve
DMI entries from pre-stored binary files. The below command
demonstrates how to read the hardware information saved in the
earlier example. We will need to use the
–from-dump option to enable this. [5]
$ sudo dmidecode --from-dump TEST
This command tells dmidecode to read the binary file
TEST and decode the DMI data encoded in this document. It
is often useful for debugging legacy machines and many other
cases.
7. Specify Device
File
By default, dmidecode reads the memory information from the file
/dev/mem. This is a low-level system file that
provides access to the physical memory of Linux machines. You can
tell dmidecode to read a different device file using the
-d or –dev-mem option.
$ sudo dmidecode -d FILE
$ sudo dmidecode --dev-mem FILE
However, we don’t encourage you to use different device files
unless you know what you’re getting into. It remains an option,
that’s all.
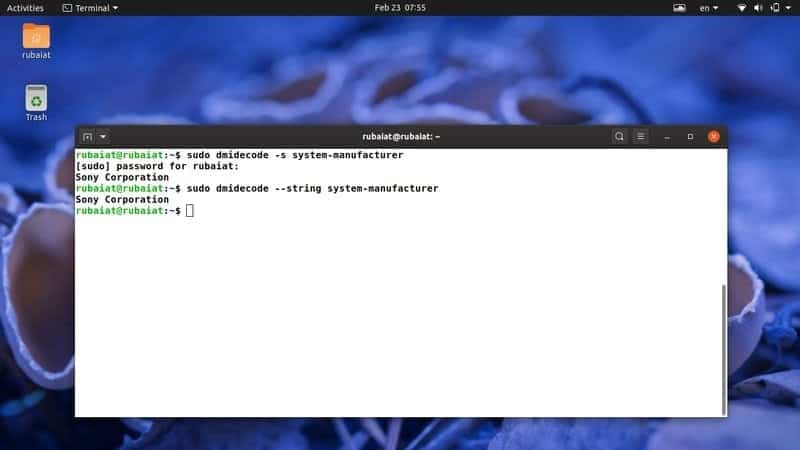
8. Display System
Manufacturer
One of the easiest yet useful usages of dmidecode can be
illustrated using a simple example. You can print out the name of
your system manufacturer using the -s or
–string option. Take a look at the next example to
see how this works.
$ sudo dmidecode -s system-manufacturer
$ sudo dmidecode --string system-manufacturer
So by sending the keyword system-manufacturer
as the argument to -s, we get the name of the
system manufacturer.
9. Display Product
Name
The following command demonstrates another usage of the above
option and prints out the name of your system product. For
instance, this command will print out the model number of your
laptop.
$ sudo dmidecode -s system-product-name
$ sudo dmidecode --string system-product-name
We can also get this data using dmidecode types and filter out
irrelevant information using the Linux
grep command[6]. Try using this command
to retrieve the model number yourself.
10. Display Serial
Number
One standard use of dmidecode command is to print out the serial
number of your system. You can retrieve the serial number of your
laptops very easily using the following dmidecode command.
$ sudo dmidecode -s system-serial-number
$ sudo dmidecode --string system-serial-number
This command prints out the serial number of my Sony VAIO
Notebook. It should work effortlessly with other models too.
11. Display System
UUID
The UUID is a Universally Unique Identifier used for system
identification and other tasks. You can use dmidecode to print out
your system UUID effortlessly. Take a look at the below command to
see how this works in detail.
$ sudo dmidecode -s system-uuid
$ sudo dmidecode --string system-uuid
So you just need to pass the keyword
system-uuid as the argument to the
–string parameter to obtain the UUID value.
12. Display BIOS
Vendor
The BIOS (Basic Input Output System) is responsible for the
initialization of our machines at boot time. There are multiple
popular BIOS vendors out there, including American
Megatrends, Insyde Software, and Phoenix
Technologies. The dmidecode tool also allows users to print
out the name of the BIOS vendor, as shown below.
$ sudo dmidecode -s bios-vendor
$ sudo dmidecode --string bios-vendor
When I run this command in my workstation, it shows that my BIOS
was developed by Insyde Corp.
13. Display BIOS
Version
BIOS version is useful information for many users since it’s
hard to perform some BIOS-specific operations without knowing this.
It is often useful when determining BIOS updates and so on. The
following command illustrates how to retrieve this information
using dmidecode.
$ sudo dmidecode -s bios-vendor
$ sudo dmidecode --string bios-vendor
This is a helpful command with many practical use cases. So take
a good look at it.
14. Display BIOS Release
Date
We are now illustrating the use of dmidecode in retrieving the
release date of your system’s BIOS. This information will be
helpful for users who want to update or modify their firmware
manually.
$ sudo dmidecode -s bios-release-date
$ sudo dmidecode --string bios-release-date
For instance, I’ve just found out that my VAIO notebook has a
pretty recent firmware using this command. Check yours too, and see
for yourself.
15. Display Baseboard
Name
The motherboard or mainboard is one of the most crucial hardware
components of your system. It is also known as baseboard and system
board. You can pass the keyword
baseboard-product-name as an argument to the
–string parameter for obtaining this
information.
$ sudo dmidecode -s baseboard-product-name
$ sudo dmidecode --string baseboard-product-name
Other useful mainboard-related information provided by the
dmidecode command are the serial number, version, and asset
tag.
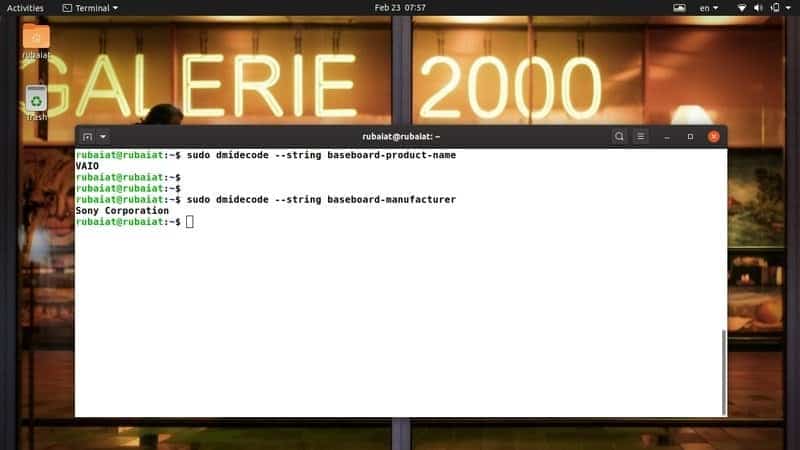
16. Display Baseboard
Vendor
Like the BIOS manufacturer, dmidecode also provides us the
vendor name for our mainboard. Take a quick look at the below
illustration to see how this works.
$ sudo dmidecode -s baseboard-manufacturer
$ sudo dmidecode --string baseboard-manufacturer
So, you can grab the name of your motherboard’s manufacturer by
simply passing the baseboard-manufacturer keyword
as the argument for -s or
–string. Remember to prefix your command with
sudo, or else it will not work.
17. Display Baseboard Serial
Number
The serial number of your baseboard is a unique identifier and
may come handy when troubleshooting hardware problems. You can
easily grab this serial using dmidecode and use this information to
see whether your product is authentic or not.
$ sudo dmidecode --string baseboard-serial-number
However, many older systems may not contain this value in their
DMI table, and in this case, dmidecode can not provide the
answer.
18. Display Processor
Family
Processors are the core component of our system. They are
usually grouped according to features and levels. You can easily
find out the processor family using dmidecode. Take a close look at
the next example to see this in action.
$ sudo dmidecode -s processor-family
$ sudo dmidecode --string processor-family
For example, I just verified that my workstation is powered by a
processor that belongs to the Intel Core i7 family. Try this
yourself and verify whether you’re getting the expected result.
19. Display Processor
Model
As we have already discussed, the processor family is a
generalized group and doesn’t provide us the exact model number.
Luckily, you can use dmidecode tool to find out the exact model of
your processor. See the below example to learn how this works.
$ sudo dmidecode -s processor-version
$ sudo dmidecode --string processor-version
So, we just need to pass the keyword
processor-version as the value of the
-s or –string parameter. You
should get the accurate model of your processor.
20. Display Processor
Frequency
The clock rate or frequency of the processor is crucial to its
performance. Usually, performance increases with an increase in
frequency. Manufacturers normally tune their products in a way, so
that processor speed is kept around a base speed, which is often
lower than the processor’s capability.
$ sudo dmidecode -s processor-frequency
$ sudo dmidecode --string processor-frequency
We can retrieve much more additional information about the
processor using the Linux dmidecode command. You’ll learn more
about them as you continue.
21. Display System
Properties
We can also dump DMI entries based on their types. The DMI table
contains 42 different DMI types, each representing components like
the chassis, processor, memory, etc. Take a look at the next
example and see how to retrieve system properties from the SMBIOS
using types.
$ sudo dmidecode -t 1
$ sudo dmidecode --type system
The -t or –type option can
take either a keyword or a type id. There are multiple types of ids
for several components. For example, the system type has ids 1, 12,
15, 23, 32. Type 12 represents System Configuration Options, 15
represents System Event Log, 23 represents System Reset, and System
Boot is represented by 32.
22. Display Baseboard
Properties
The baseboard properties are represented by DMI types 2, 10, and
41. Type 2 provides overall baseboard properties, whereas the
latter two gives information about onboard devices.
$ sudo dmidecode --type 2
$ sudo dmidecode --type baseboard
However, there’s a small difference in the output produced by
the above commands. When the type id is used, dmidecode provides
the exact DMI entries for that type. But when you use the type
keyword, all DMI entries associated with that keyword are
displayed.
23. Display Processor
Properties
The below commands will illustrate how to retrieve processor
information using DMI types. The processor type only has one type
of id, namely 4. So it’s pretty straightforward to fetch.
$ sudo dmidecode --type 4
$ sudo dmidecode --type processor
We get a lot of information about the processor like the
processor family, manufacturer, type, model, active flags, ad so
on. You will also find out the maximum frequency supported by your
processor and its currently set value from this output.
24. Display Memory
Properties
The memory components include the Memory Controller, Memory
Module, Physical Memory Array, and Memory Devices. They have the
following DMI types, respectively – 5, 6, 16, 17. Take a look at
how we retrieve memory properties using dmidecode types.
$ sudo dmidecode --type memory
This command provides information about the number of installed
RAMs, their form factor, type, size, bus speed, and many more. Many
SMBIOS doesn’t provide expected data when type ids are used. Thus,
we recommend you to use the type identifier for this command.
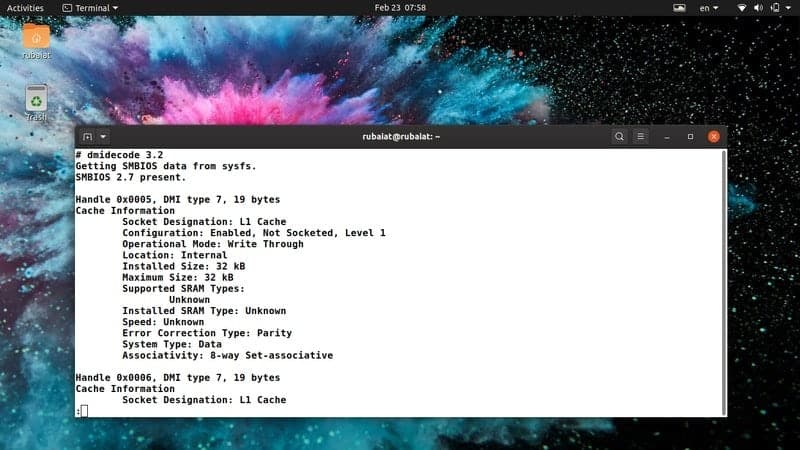
25. Display Cache
Properties
The cache is one of the most important parts of your system.
Although you may not know this, cache speeds have more impact on
performance than processing frequency. Modern processors usually
have multiple caches, divided into different levels. We can easily
grab the cache properties of Linux machines using the below
dmidecode command.
$ sudo dmidecode --type 7
$ sudo dmidecode --type cache
Both of these commands provide useful information on caches such
as their sizes, associativity, configuration, and many more.
26. Display Chassis
Properties
The chassis properties come in handy when you plan system
upgrades or want to troubleshoot potential hardware problems. Like
other system components, we can also retrieve chassis properties
using dmidecode type. You can either use the chassis keyword or its
type, which is 3.
$ sudo dmidecode --type 3
$ sudo dmidecode --type chassis
They provide a lot of information such as chassis type,
manufacturer, serial, boot state, thermal state, and so on.
However, all SMBIOS doesn’t contain accurate chassis data. So be
sure to verify these data.
27. Display OEM
Strings
You can print out the OEM strings of your system using
dmidecode. These are free-form data stored by the SMBIOS and can
change after firmware updates. Take a look at the following
commands to see them in action.
$ sudo dmidecode --type 11
There is no pre-defined keyword for this DMI type. So you will
need to use the type id instead. OEM values usually contain
information about the original system manufacturer.
28. Display Physical Range of
Memory
One fascinating feature of dmidecode is that it allows us to
visualize the entire physical range of your DIMM RAMs. You can use
the type id 20 for that. It represents the DMI entry Memory Device
Mapped Address.
$ sudo dmidecode --type 20
Running this command will display the entire physical range of
the DIMMs alongside their handles, row position, and interleaved
positions. There is no specified keyword for this type, so you’ll
need to use the id here.
29. Display Boot
Status
The boot status of your system contains useful information like
the presence of errors and so forth. It is often a good idea to
check your boot status when troubleshooting issues like system boot
failure, automatic shutdown, and such. The below example utilizes
dmidecode types to perform this job.
$ sudo dmidecode --type 32
You can also get this information using the system keyword.
However, that result will contain more additional information.
30. Display Core and Thread
Count
Modern processors provide multiple cores and threads for better
utilization of CPU resources. The core is an actual hardware
component, whereas thread is a virtual component. Processors allow
multi-tasking abilities using these components. The below dmidecode
command retrieves the number of processor cores and threads
available in your machine.
$ sudo dmidecode --type 4 | grep -iw count
You should get a clear result after running this command. We’ve
simply used the Linux grep command[7]
to filter out the information we’re interested in.
31. Display Processor
Speeds
Linux and BSD users can use dmidecode to print out the speed of
their processors. Processors usually have speeds in MHz or GHz.
System manufacturers often tune down the processor speed for
preventing overheating and such. The below command prints out the
max speed supported by your processor and its current speed.
$ sudo dmidecode --type 4 | grep -i speed
This information can be useful if you want to overclock your
processor or troubleshoot heating issues. However, you should never
overclock unless you know what you’re getting into.
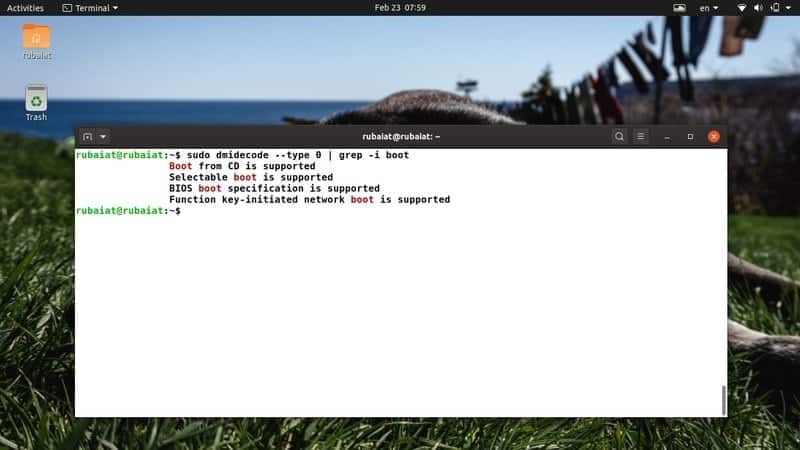
32. Display Boot
Options
Linux boot loaders[8]
are responsible for starting your system according to the boot
table. Modern operating systems offer multiple booting options such
as USB boot, CD boot, and network boots. You can use the dmidecode
utility to find out what booting options are supported by your
BIOS.
$ sudo dmidecode --type 0 | grep -i boot
The above command notifies me that my BIOS supports selectable
boot, boot from CD/USB, and network boot. Try this command in your
favorite Linux terminal[9]
to see yours.
33. Display Cache
Sizes
Modern processors contain multiple levels of caches. Lower level
caches are faster but smaller. Higher-level caches are larger but
considerably slower. You can use dmidecode to print out your cache
levels and their sizes. Take a look at the below command to see
this in action.
$ sudo dmidecode --type 7 | grep -i size
This command shows the installed size and maximum size of your
processor caches. You can substitute the size parameter for grep
and get more specific data. Visit this guide to learn more about Linux grep
commands[10].
34. Display RAM
Speeds
RAM or Memory is one of the most crucial elements of any system.
Many users don’t install the appropriate RAM modules for their
system. This results in a performance decrease. Use the below
dmidecode command to see your RAM speeds.
$ sudo dmidecode --type 17 | grep -i speed
It will provide information on the number of available RAM
slots, maximum supported speed, and currently configured speed. So
if you’re looking to upgrade your memory, fast check your current
memory and then take your decisions.
35. Display Maximum RAM
Capacity
Most systems can only house a limited amount of RAM. It is
necessary to know the maximum RAM capacity supported by your system
if you want to upgrade your build later on. The following dmidecode
example can be used to retrieve this capacity from your favorite Linux shell[11].
$ sudo dmidecode --type 16 | grep -i maximum
This is a very simple but effective example of dmidecode.
Starting Linux, users can learn a lot about their system using
these useful commands.
36. Display Installed RAM
Capacity
We learned to view the maximum RAM capacity supported by our
machine in the earlier example. The below example demonstrates how
to find the size of currently installed RAM.
$ sudo dmidecode --type 17 | grep -i size
This command will show you the currently installed RAM capacity
in your memory slots. Most systems usually provide more than one
RAM slot. So, you can easily determine the amount of additional RAM
supported by your machine. If any of the slots doesn’t have any RAM
installed in them, you will get a notification saying no module
installed.
37. Display Chassis Serial
Number
The serial number of your chassis works as a unique identifier.
You can view this number very easily by using the following
commands.
$ sudo dmidecode --string chassis-serial-number
$ sudo dmidecode --type 3 | grep -i serial
So you can use either the –string parameter or
the –type parameter. The grep command is useful
for filtering out information from large DMI outputs.
38. View dmidecode
Version
You can use the following terminal command to inspect your
dmidecode version number. New users can use this command to verify
whether dmidecode is accessible from their current path.
$ dmidecode --version
Since most modern Linux distributions[12] come with dmidecode,
your system should have it installed already.
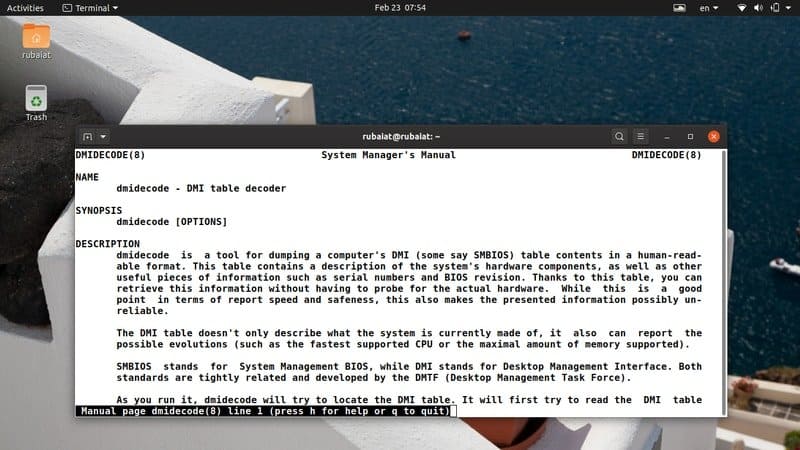
39. View Manual Page
The dmidecode man page contains all the information required to
master this tool. You can find the list of all supported parameters
and types here. You should take a look at this manual if you are
looking for an in-depth explanation of how dmidecode works.
$ man dmidecode
The manual is also accessible from the internet. However, there
may be some differences between Linux
and BSD versions[13]. So we encourage you to
use the man command instead.
40. View Help Page
The help page contains a concise list of all supported
parameters and their usage. This is handy if you want a quick
overview of the available options.
$ dmidecode --help
It will provide you with summarized information of all
parameters supported by the dmidecode utility.
Ending Thoughts
Linux dmidecode commands are useful in a number of situations,
including hardware troubleshoots and upgrades. However, the
information provided by dmidecode is not always accurate. It can
often provide some unknown, inactive, or OEM -specific entries that
are not usable by everyday users. We have tried our best to
pinpoint the commands that work best in practical administration
work. Additionally, dmidecode requires sudo
privileges since it interacts with the DMI table directly. You can
switch to the root user if you don’t want to type in
sudo each time. Leave us your comments regarding
this guide and keep coming back for more Linux terminal
commands.
References
- ^
SMBIOS
(en.wikipedia.org) - ^
Linux terminal emulator.
(www.ubuntupit.com) - ^
debugging CPU issues
(www.ubuntupit.com) - ^
standard Linux tools
(www.ubuntupit.com) - ^
Linux
and BSD (www.ubuntupit.com) - ^
Linux grep command
(www.ubuntupit.com) - ^
Linux
grep command (www.ubuntupit.com) - ^
Linux
boot loaders (www.ubuntupit.com) - ^
favorite
Linux terminal (www.ubuntupit.com) - ^
guide
to learn more about Linux grep commands
(www.ubuntupit.com) - ^
favorite Linux shell
(www.ubuntupit.com) - ^
most
modern Linux distributions
(www.ubuntupit.com) - ^
Linux and BSD versions
(www.ubuntupit.com)
Read more https://www.ubuntupit.com/simple-and-useful-dmidecode-commands-for-linux/