The lsof command is one of the most compelling Linux
terminal commands for admins and power users. The name lsof
stands for “List of Open Files” and it provides information about
all files opened by some process. Open files may refer to several
file types, including regular files, directories, network streams,
executing reference, block files, and so on. The most common usage
of lsof is debugging system issues. Linux network admins also rely
on lsof when troubleshooting network issues. Our editors have
selected 40 simple but extremely useful examples of lsof to help
users learn this command in more detail. [1]
Most Useful “lsof Command” in
Linux
Since the Linux filesystem[2]
considers everything in your system as a file, it is mandatory to
have better control over your files. The lsof utility lets you do
just this and provides much more additional information useful in
debugging. Network admins can use lsof for reviewing open network
sockets and strengthen their network security using this
information.

1. List All Open
Files
In its simplest usage, lsof prints out all currently opened
files. Do not panic when you see a bunch of unknown files. They are
system files created by underlying processes and the Linux kernel.
The output information is divided into several columns, like
COMMAND, PID, USER, FD, and TYPE.
$ lsof
$ lsof | less
COMMAND denotes the program that invoked the file, PID denotes
the process ID, TYPE represents the filetype, and FD is the file
descriptor. You’ll know more about them as you progress throughout
this guide.
2. Suppress Kernel
Blocks
The output of the above command contains a lot of block files
that are opened by the kernel and makes little sense to most
non-technical users. Luckily, lsof allows us to suppress these
files using the -b option.
$ lsof -b
Now lsof will avoid listing the kernel blocks and guarantee that
commands like stat, lstat, and
readlink work without any problem. You should use
this option whenever working with low-level system files and so
on.
3. List Files Based on
Username
We can easily list all the open files for a specific user using
the lsof Linux command. Simply add the -u option,
followed by the username.
$ lsof -u abc
This command will list files opened by the user abc.
You can also use multiple usernames at the same time using a
comma-separated list. However, it will fail if there are any spaces
between the usernames.
$ lsof -u aaa,bbb,ccc
It will now list files opened by the three hypothetical users.
You can also add the ^(negation) operator in front
of a username. It will cause lsof to omit files that are opened by
those users.
$ lsof -u ^xyz
4. List Network
Files
Network files are files associated with the TCP/IP stack, namely
sockets. You can use the -i option to list all the
currently opened network files using lsof.
$ lsof -i
It will print all network files alongside their type and
associated protocols. Use -i4 or
-i6 to list either IPv4 and IPv6 files.
$ lsof -i4
$ lsof -i6
5. List all TCP/UDP
Files
The below commands demonstrate how to use lsof for printing out
all currently opened TCP and UDP process. TCP or Transmission
Control Protocol is the de-facto communication protocol used by
modern networks. To list all TCP processes, use the following
command.
$ lsof -i TCP
UDP or User Datagram Protocol is a stateless protocol used for
low-latency data transfers. You can use the following command to
list all UDP processes using lsof.
$ lsof -i UDP
6. List Processes Running on
Specific Ports
The -i option also allows admins to list all
files that are being run on a specific port. This is useful in
network troubleshooting and allows admins to define robust Linux iptables
rules[3].
$ lsof -i TCP:22
This command will list the processes that are running on TCP
port 22. The ssh daemon usually runs on port 22. You can check for
other ports as well. The below command looks for all processes
running on port 443.
$ lsof -i TCP:443
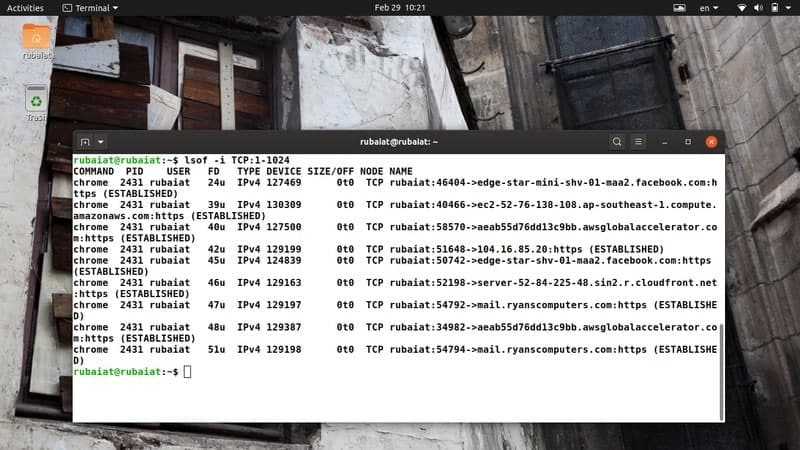
7. List Processes Running on a
Range of Ports
The below command lists all files that are created by processes
running on a specified range of ports. We are simply defining the
range, and lsof will output any file it can associate with any of
these port numbers.
$ lsof -i TCP:1-1024
Now, lsof will look for processes running on any TCP port
between 1-1024 and list all active files created by these
processes.
8. List Files Using
PID
A PID or process ID is a unique identifier used for tagging
operating system processes. The lsof command allows admins to
search for and list files based on their PID. The below command
lists all files associated with the process ID 1.
$ lsof -p 1
You can also specify multiple PIDs using a comma-separated list.
However, be sure not to use any whitespace, or else the command
will not work as expected.
$ lsof -p 1,2,3,^111
This command will list all files opened by processes 1, 2, and
3. It will omit those files opened by the process 111.
9. List Files of a Specific
Filesystem
The Linux filesystem hierarchy[4] is very robust and
allows admins to perform various operations on them. You can use
lsof command in Linux to print out all open files in a specific
file system, as shown below.
$ lsof /proc
$ lsof /run/
$ lsof /sys/
The /proc directory contains information about
actively running processes. You can easily inspect this information
using lsof in Linux and BSD distributions.
10. List Unix Domain
Sockets
The lsof utility allows us to list all Unix socket files or
IPC(Inter-Process Communication) sockets. These files enable the
host in communicating with other processes in the machine. Take a
quick look at the below example to see how this works in
real-life.
$ lsof -U
To find all Unix socket files that have a distinct process ID,
use the following lsof command.
$ lsof -U -a -p 18250
Replace 18250 with the PID of the process you want to look at.
It will present all Unix domain sockets that contain the same
PID.
11. List All Active
PID
The lsof utility also enables admins to list all currently
running processes using their PID. This is useful in a number of
situations, like piping the result to the Linux kill command and so
on.
$ lsof -t
$ lsof -t -i
The first command simply performs a usual lsof and then omits
all output fields except the PIDs. The second variant displays the
PIDs of the network processes only. We can simply grep for a
specific PID and feed it to other commands.
12. List Files Based on
Device
Device files are a special type of file in Linux and BSD systems[5]. They usually act as an
interface to different device drivers and don’t behave like
ordinary files. The following example shows us how to list all open
files of a specific device.
$ lsof /dev/sda9 | less
You can list your block devices using the lsblk
command. Most modern Linux distributions keep these files in the
/dev directory.
13 List Terminal
Files
The /dev directory also contains special device
files like /dev/tty. These are unique device files
that provide access to the terminal for a given process. You can
leverage lsof to list all open files that are associated with the
terminal.
$ lsof /dev/tty*
$ lsof /dev/tty2
$ lsof /dev/ttyS0
The first command lists open files for all controlling
terminals, whereas the second command targets a specific console.
The final example lists the files associated with your serial port
(/dev/ttyS0).
14. List Open Files in
Directories
You can use the lsof command to list all open files in a
specific directory. The below command illustrates this using a
simple but practical example.
$ lsof +D Documents
$ sudo lsof +D ~/
The first command lists all open files under the Documents
directory. The second command lists all open files under the home
directory and its sub-directories. The second command will work
even without sudo but will show some warnings
in the output.
15. Recursively List Open Files in
Directories
The above command will only display files that are opened in the
Documents directory. It will not display any open files under the
sub-directories of Documents. Luckily, lsof provides another handy
option to enable this. Look at the below example for better
understanding this option.
$ lsof +d Documents
$ sudo lsof +d ~/
This command will display all open files in the Documents
directory and then descend into the sub-directories, if any. Note
that this may take very long if Documents is large and has a lot of
sub-directories.
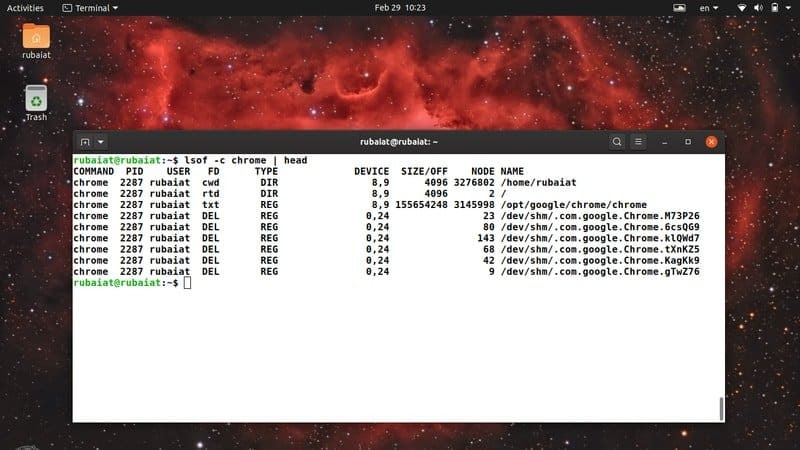
16. List Open Files Based on
Process
Earlier, we have listed all open files using their PIDs.
However, we can also print out the list of files active at a given
time using their process name. Take a look at the below example and
type this in your favorite Linux terminal emulator[6] to see how they
work.
$ lsof -c chrome
This command will output all open files that are spawned by the
chrome process. Note that there might be several processes whose
names start with the string chrome. This command will present all
of them in the output.
17. List Parent Process
ID(PPID)
The lsof utility allows admins to list the parent process
identification number (PPID) alongside regular output fields. You
will need to pass the -R option for enabling this, as illustrated
below.
$ lsof -R
$ lsof -p [PID HERE] -R
The first command prints out all currently active processes
along with their PPID information. The last command takes a PID
number and displays the PPID for that process.
18. List PIDs that Have Opened a
File
The following command lists all process ids that have opened a
specific file. Here we are using the -t option
introduced earlier.
$ lsof -t /usr/share/mime/mime.cache
Since the -t option only provides the PIDs, we leverage it for
producing our expected output. This command will list all process
ids who have opened the /usr/share/mime/mime.cache
document.
19. List Files Based on File
Descriptors
We can instruct lsof to list open files based on file
descriptors. The following command illustrates how to find all
currently open files that have the FD(File Descriptor) field set as
cwd(Current Working Directory).
$ lsof -d cwd
$ lsof -u xyz -d cwd -a
The first command will output every open file under the current
working directory. The second command lists files that belong to
the user xyz. The -a option is required for this
bit, and the command will not work as expected without this
option.
20. Display Output for Other
Programs
The lsof command allows admins to produce output for parsing
with external tools like awk, Perl, and the C programming language.
You will need to pass the -F option alongside
character lists for field identification.
$ lsof -F
$ lsof -FucsS
The first command produces a useful output that can be saved
using the redirection operator (>) and parsed
later. The second example modifies the output for accomodating
additional data like process command name, user ID, stream
identification, and size.
21. List Failed
Items
Often lsof fails to find some items that the user requested. It
is quite hard to find those items since the output produced by lsof
is very extensive. Luckily, the -V option allows
lsof to print out these items very conveniently.
$ lsof -V
$ lsof -c ssh -c http -V
$ lsof -p 12312312 -V
The first example will list all such files that lsof failed to
find. The second example can be used to find whether there are any
process commands whose names starts with ssh or http. The final
example illustrates the usage of -V for process
IDs.
22. Display TCP/TPI
Information
By default, lsof provides little information regarding TCP/TPI
connections. It only provides reports on connection states.
However, we can leverage the -T option for enabling additional
reporting features, as shown below.
$ lsof -i -Tq
$ lsof -i -Tqs
The first command will show the queue length(q) in its output.
The second command will show the connection state(s) alongside the
queue length. The default is -Ts, and when you use
only -T, it will turn off all TCP/TPI
reporting.
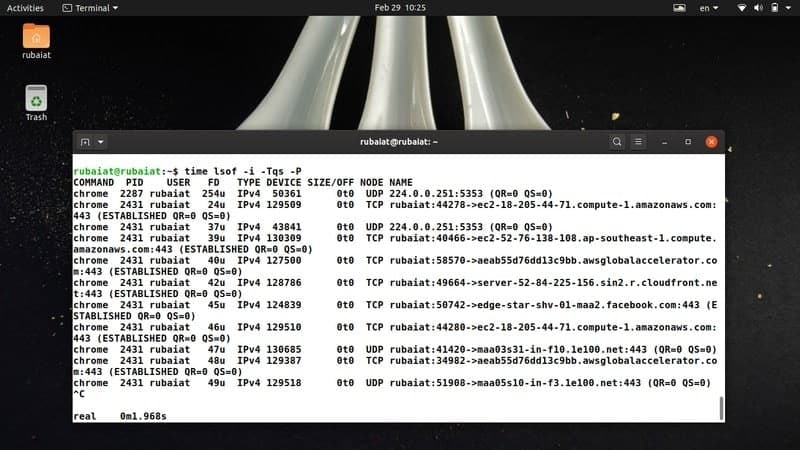
23. Disable Port Number
Conversion
The -P option enables admins to disable the
conversion of port numbers to names when looking for network files
or Unix sockets. It can save a considerable amount of time when
there are too many such files.
$ lsof -i -Tqs -P
You can compare the time taken by this command to the time taken
by the same command but without the -P option.
We’ll use a standard Linux terminal tool called time for this
purpose.
$ time lsof -i -Tqs
$ time lsof -i -Tqs -P
The execution time has been reduced to one by sixth in my
machine.
24. Disable Host Name
Conversion
Like port names, we can also disable the hostname conversion
from network numbers. It will also result in a significant increase
in performance, as you shall see. The Linux time command will come
handy again for proving this.
$ lsof -i -n
This time, lsof will not convert the network numbers into
hostnames. Use the following commands to verify the change in
execution speed.
$ time lsof -i
$ time lsof -i -n
$ time lsof -i -n -P
25. Enable Repeat
Mode
The lsof command in Linux provides a convenient repeat mode for
monitoring live operations without exiting the output console. Take
a look at the below examples to learn this in more detail.
$ lsof -r 5 -i UDP
This command will output all ongoing UDP connections in every 5
seconds until you terminate the command using Ctrl +
C. You may also use the +r option, which
will exit automatically if there are no additional charges in the
output.
$ lsof +r 5 -i UDP
26. List All Processes Listening
to TCP Ports
We can list all processes which are listening to TCP ports using
the lsof utility. We will make use of several already shown
parameters to do this task. Look at the below example to figure out
how this works.
$ lsof -nP -i TCP -s TCP:LISTEN
This command disables the conversion of host names and port
names using the -n and -P option,
which are merged together. The -s option tells
lsof that we’re only interested in processes that are listening to
TCP ports.
27. List Processes Based on
Protocols
We can also define specific protocols that we’re interested in.
A quick glance into the below commands will help you understand
this much better.
$ lsof -i TCP:https
$ lsof -i UDP:ntp
The first command shows all TCP files that are using the https
port, which is 443 by default. The latter command shows all UDP
files which are using the NTP (Network Time Protocol) port. The
next command displays all such UDP files that are using IPv4
connections.
$ lsof -i4 -a -i UDP:ntp
28. Display Total Amount of
TCP/UDP Connections
We can use some traditional terminal tools like grep and awk to
print out the total number of active TCP or UDP connections. The
below command demonstrates this lsof alongside awk, sort, and
uniq.
$ lsof -i | awk '{print $8}' | sort | uniq -c | grep 'TCP\|UDP'
Here we have used several commands to perform our task. The awk
portion prints out the NODE section of the output provided by lsof,
uniq counts the number of lines, and grep searches for the given
patterns. Visit our guide on Linux grep command[7] to learn more about
pattern finding.
29. List Established Network
Connections
The below command shows how to get all established network
connections using standard Linux tools. We will first list all
network files and then extract specific data from the output
provided by lsof using awk and grep.
$ lsof -i -nP | grep ESTABLISHED | awk '{print $1, $9}' | sort -u
The -nP option disables the conversion of host
and port names. It is used for speeding up the overall process and
is not mandatory.
30. List All Active SSH
Connections
We can also list all ssh connections made from/to our system
using lsof and grep. Take a quick look at the next examples to see
how this works in real-time.
$ lsof -i TCP | grep ssh | grep ESTABLISHED
$ lsof -nP -iTCP -sTCP:ESTABLISHED | grep SSH
Both of the above commands work quite similarly. However, the
latter one is faster due to the usage of some inhibition flags like
-n and -P.
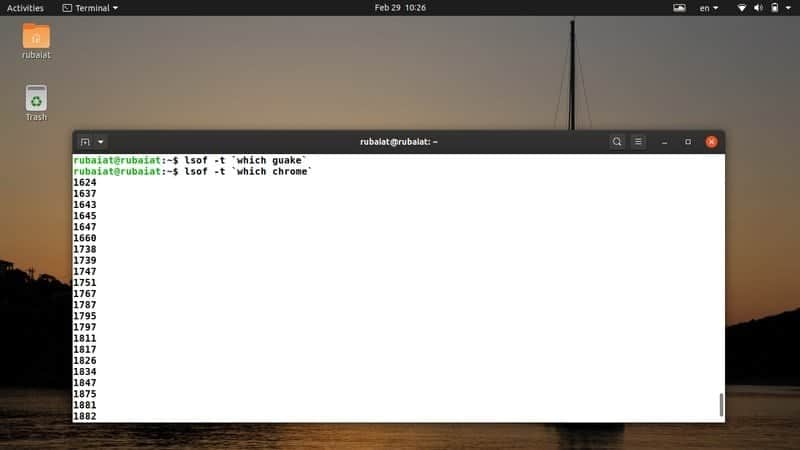
31. List Processes Based on File
Access
The lsof command also allows system admins to determine which
processes are using a specified file. The below commands shows this
using the Linux, which commands alongside lsof.
$ lsof `which lsof`
$ lsof `which kate`
So by simply passing the particular file to lsof within
backticks, we can do this. You can replace any of the above with
files that you want to inspect and get list the processes who are
accessing that. Use the -t option to retrieve the
PIDs only.
$ lsof -t `which chrome`
$ lsof -t `which nmap`
32. Kill Processes Owned by
User
Since lsof provides the ownership information of open files, we
can utilize it to kill a process from the terminal. The below
command illustrates how to create all processes owned by the user
ABC using the kill command alongside lsof.
$ sudo kill -9 `lsof -t -u ABC`
You should replace ABC with an actual username for successfully
killing the processes spawned by that user. Most recent Linux distributions[8] will require you to have
sudo privileges if you want to kill other user’s
processes.
33. Display Files Using Regular
Expressions
The lsof utility allows admins to filter out information using
regular expression patterns. You will need to put the specified
pattern inside two forward slashes(/) to make this work. For
example, the below example will list all commands that have more
than six characters in them.
$ lsof -c /^......*/
Note that the forward slashes are mandatory when using regular
expressions with lsof. Each of the six dots represents a single
character, whereas the asterisk(*) denotes that anything after
these six characters is eligible.
34. List Which Processes are Using
NFS
We can easily list all the processes that are taking up
NFS(Network File System) resources on our server. The lsof command
in Linux exposes the -N option for this task. See
the below example to understand it in more detail.
$ lsof -N
The output of this command will contain information like the
process ids alongside their mount point. This data is very easy to
extract using the grep command and helps reducing issues regarding
Linux NAS and SAN solutions[9].
35. List Used but Deleted
Files
The lsof command allows us to determine which files have been
used by some processes earlier and are currently deleted. This is
handy in a number of situations, like when verifying disk space
using the Linux df command.[10]
$ lsof /var/log | grep -i "deleted"
This command will list the PID of all files that have been
recently deleted by the operating system kernel but still takes
space in your machine. You can use these PIDs to kill these
processes.
36. Count Number of
Entries
Since the output produced by lsof contains a lot of entries, it
often becomes hard to visualize them. We can easily count the
number of lines present in this output by piping this data to a
handy and useful Linux tool called wc. Take a look at the below
example to see how this works.
$ lsof | wc -l
$ lsof -t -i -nP | wc -l
The above commands feed the output of lsof to wc and display the
total number of rows present in lsof’s output.
37. Enable/Disable Warning
Messages
Some lsof commands may show you warning messages when executing.
Luckily, we can enable/disable these warnings as we see fit. To
disable warning in lsof’s output, use the following command.
$ lsof -t -i -nP -w
The -w option will suppress any potential
warnings. You should use the +w option for
re-enabling this feature.
$ lsof -t -i -nP +w
So this way, we can set the warning parameter as required. It is
often useful when used in conjunction with Linux shell scripts[11].
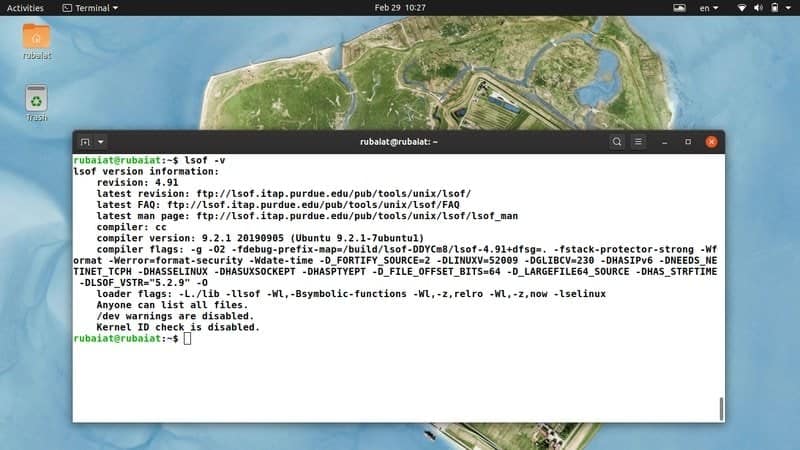
38. Display Version
Information
The lsof utility may have some variations between Linux and BSD
variants. We can list the version information of lsof in these
machines and see useful information like revision number,
compilation date, compiler version, and so on.
$ lsof -v
It also shows us all the configuration parameters used for
building the binary end product. Additionally, the values for the
compiler and loader flags are useful for system developers as well
as admins.
39. Display Help
Page
The help page of lsof contains summarized information of all
available command-line options and their basic usage. You can
consult this whenever you are unsure of a particular option.
$ lsof --help
This page returns all possible combinations of lsof’s parameters
and is useful for both starting and experienced Linux users.
40. Display Manual
Page
The manual contains an in-depth discussion of the lsof utility
and explains the available parameters in detail. You should
definitely consult this manual if you are a new
Linux user with no prior experience of lsof or similar Linux terminal commands.[12][13]
$ man lsof
This will provide you all the information required to handle
lsof and use it for day to day system monitoring tasks. It is
extremely useful for new users, and you should always consult this
when you face problems lsof.
Ending Thoughts
The lsof command in Linux is a compelling monitoring tool that
allows admins to visualize how processes are using various files.
Although seemingly complex to many, using this tool is no different
than other traditional command-line tools. Our editors have
selected these 40 simple but practical lsof Linux examples to help
you kickstart your journey with this amazing tool. Hopefully, we
provided you the essential information you were looking for. You
should now be able to handle lsof on your own. Leave us a comment
if you have any questions regarding the lsof utility and visit us
regularly for more guides on exciting Linux commands.
References
- ^
Linux terminal commands
(www.ubuntupit.com) - ^
the
Linux filesystem (www.ubuntupit.com) - ^
define
robust Linux iptables rules
(www.ubuntupit.com) - ^
Linux
filesystem hierarchy (www.ubuntupit.com) - ^
Linux
and BSD systems (www.ubuntupit.com) - ^
favorite
Linux terminal emulator (www.ubuntupit.com) - ^
our
guide on Linux grep command
(www.ubuntupit.com) - ^
recent
Linux distributions (www.ubuntupit.com) - ^
Linux
NAS and SAN solutions (www.ubuntupit.com) - ^
the
Linux df command (www.ubuntupit.com) - ^
Linux
shell scripts (www.ubuntupit.com) - ^
consult this manual
(linux.die.net) - ^
Linux
terminal commands. (www.ubuntupit.com)
Read more https://www.ubuntupit.com/simple-and-effective-lsof-command-in-linux/